Create EKS managed node groups with Spot capacity
In this section we will deploy the instance types we selected in previous chapter and create managed node groups that adhere to Spot diversification best practices. We will update the existing Terraform template used to create the cluster. Remember to continue using your Cloud9 workspace to run all commands.
Head over to the eksworkshop folder in your Cloud9 workspace.
cd $HOME/environment/eksworkshop
Open the main.tf template file, there’s a section within the managed_node_groups section with the following comment // ### -->> SPOT NODE GROUP GOES HERE <<--- ###. Here’s a screenshot for reference:
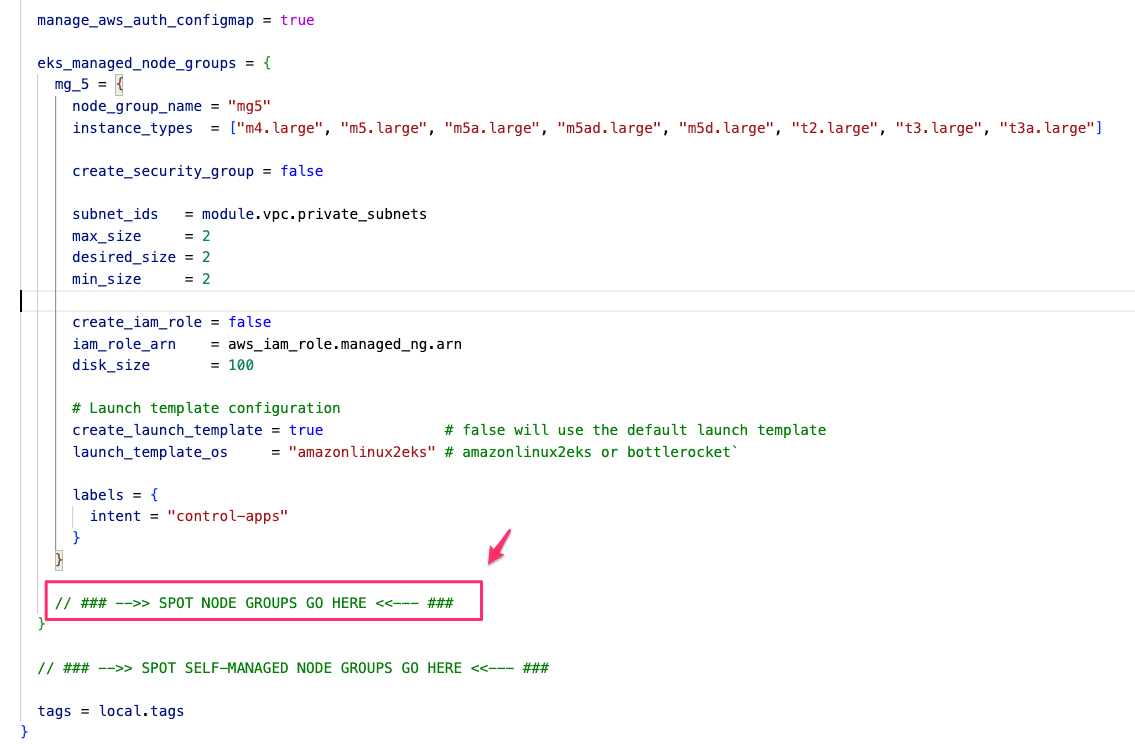
Now copy the following code snippet, and paste it just below the // ### -->> SPOT NODE GROUP GOES HERE <<--- ### line to create two Spot node groups:
    spot_4vcpu_16mem = {
      node_group_name = "mng-spot-4vcpu-16gb"
      capacity_type   = "SPOT"
      instance_types  = ["m4.xlarge", "m5.xlarge", "m5a.xlarge", "m5ad.xlarge", "m5d.xlarge", "t2.xlarge", "t3.xlarge", "t3a.xlarge"]
      max_size        = 4
      desired_size    = 2
      min_size        = 0

      subnet_ids = module.vpc.private_subnets

      taints = {
        spotInstance = {
          key    = "spotInstance"
          value  = "true"
          effect = "PREFER_NO_SCHEDULE"
        }
      }

      labels = {
        intent = "apps"
      }
    },

    spot_8vcpu_32mem = {
      node_group_name = "mng-spot-8vcpu-32gb"
      capacity_type   = "SPOT"
      instance_types  = ["m4.2xlarge", "m5.2xlarge", "m5a.2xlarge", "m5ad.2xlarge", "m5d.2xlarge", "t2.2xlarge", "t3.2xlarge", "t3a.2xlarge"]
      max_size        = 2
      desired_size    = 1
      min_size        = 0

      subnet_ids = module.vpc.private_subnets

      taints = {
        spotInstance = {
          key    = "spotInstance"
          value  = "true"
          effect = "PREFER_NO_SCHEDULE"
        }
      }

      labels = {
        intent = "apps"
      }
    }
Run the following command to fix any identation or configuration problem (if any):
terraform fmt
Then, apply the changes by running the following command:
terraform apply --auto-approve
Creation of node groups will take 3-4 minutes.
There are a few things to note in the configuration that we just used to create these node groups.
- Node groups configurations are set under the managed_node_groups section, this indicates that the node groups are managed by EKS.
- First node group has xlarge (4 vCPU and 16 GB) instance types with min_size 0, max_size 4 and desired_size 2.
- Second node group has 2xlarge (8 vCPU and 32 GB) instance types with min_size 0, max_size 2 and desired_size 1.
- The configuration capacity_type = “SPOT” indicates that the node group being created is an EKS managed node group with Spot capacity.
- We applied a Taint
k8s_taints = [{ key = "spotInstance", value = "true", effect = "PREFER_NO_SCHEDULE" }]. PREFER_NO_SCHEDULE is used to indicate we prefer pods not be scheduled on Spot Instances. This is a “preference” or “soft” version of NO_SCHEDULE – the system will try to avoid placing a pod that does not tolerate the taint on the node, but it is not required. - Notice that the we added a node label intent, to allow you to deploy stateless applications on nodes that have been labeled with value apps
If you are wondering at this stage: Where is spot bidding price ? you are missing some of the changes EC2 Spot Instances had since 2017. Since November 2017 EC2 Spot price changes infrequently based on long term supply and demand of spare capacity in each pool independently. You can still set up a maxPrice in scenarios where you want to set maximum budget. By default maxPrice is set to the On-Demand price; Regardless of what the maxPrice value, Spot Instances will still be charged at the current Spot market price.
Confirm the Nodes
Aside from familiarizing yourself with the kubectl commands below to obtain the cluster information, you should also explore your cluster using kube-ops-view and find out the nodes that were just created.
Confirm that the new nodes joined the cluster correctly. You should see the nodes added to the cluster.
kubectl get nodes
Managed node groups automatically create a label eks.amazonaws.com/capacityType to identify which nodes are Spot Instances and which are On-Demand Instances so that we can schedule the appropriate workloads to run on Spot Instances. You can use this node label to identify the lifecycle of the nodes
kubectl get nodes \
  --label-columns=eks.amazonaws.com/capacityType \
  --selector=eks.amazonaws.com/capacityType=SPOT
The output of this command should return nodes running on Spot Instances. The output of the command shows the CAPACITYTYPE for the current nodes is set to SPOT.
NAME                                        STATUS   ROLES    AGE   VERSION               CAPACITYTYPE
ip-10-0-11-190.eu-west-1.compute.internal   Ready    <none>   19m   v1.24.9-eks-49d8fe8   SPOT
ip-10-0-12-250.eu-west-1.compute.internal   Ready    <none>   19m   v1.24.9-eks-49d8fe8   SPOT
ip-10-0-12-48.eu-west-1.compute.internal    Ready    <none>   19m   v1.24.9-eks-49d8fe8   SPOT
Now we will show all nodes running on On Demand Instances. The output of the command shows the CAPACITYTYPE for the current nodes is set to ON_DEMAND.
kubectl get nodes \
  --label-columns=eks.amazonaws.com/capacityType \
  --selector=eks.amazonaws.com/capacityType=ON_DEMAND
NAME                                        STATUS   ROLES    AGE   VERSION               CAPACITYTYPE
ip-10-0-10-122.eu-west-1.compute.internal   Ready    <none>   21d   v1.24.7-eks-fb459a0   ON_DEMAND
ip-10-0-11-109.eu-west-1.compute.internal   Ready    <none>   21d   v1.24.7-eks-fb459a0   ON_DEMAND
ip-10-0-12-119.eu-west-1.compute.internal   Ready    <none>   21d   v1.24.7-eks-fb459a0   ON_DEMAND