Configure GitLab runners on Spot instances
In this lab you will configure GitLab CI/CD runners using GitLab HA Scaling Runner Vending Machine for AWS solution. You can find more about its features here. It is built using Infrastructure as Code (IaC) with AWS CloudFormation, but you can implement similar logic using any IaC solution of your choice.
There are also other ways to create GitLab runners on spot instances that we are not reviewing in this workshop: using Docker Machine, runners inside containers in a Kubernetes cluster with the worker nodes on spot instances, or in Amazon ECS with Fargate Spot.
Create an IAM role for GitLab Runners
- Create the trust policy document named
ec2-role-trust-policy.json.
cat << EOF > ~/environment/ec2-role-trust-policy.json
{
  "Version": "2012-10-17",
  "Statement": [
    {
      "Effect": "Allow",
      "Principal": { "Service": "ec2.amazonaws.com"},
      "Action": "sts:AssumeRole"
    }
  ]
}
EOF
- Create the gitlab-runner role and specify the trust policy that you created using the
create-rolecommand.
aws iam create-role \
    --role-name gitlab-runner \
    --assume-role-policy-document file://~/environment/ec2-role-trust-policy.json
- Create gitlab-runner-policy.json access policy document that grants access to Amazon EKS, Amazon S3, AWS Systems Manager, Amazon EC2 Auto Scaling, and Amazon ECR, which the GitLab Runners will need to build and deploy the demo app.
cat << EOF > ~/environment/gitlab-runner-policy.json
{
    "Version": "2012-10-17",
    "Statement": [
        {
            "Sid": "EKSGetAllClusters",
            "Effect": "Allow",
            "Action": [
                "eks:DescribeNodegroup",
                "eks:ListNodegroups",
                "eks:DescribeCluster",
                "eks:ListClusters",
                "eks:AccessKubernetesApi",
                "ssm:GetParameter",
                "eks:ListUpdates",
                "eks:ListFargateProfiles"
            ],
            "Resource": "*"
        },
        {
            "Sid": "ASGSelfAccess",
            "Effect": "Allow",
            "Action": [
                "iam:ListAccountAliases",
                "autoscaling:DescribeAutoScalingInstances",
                "autoscaling:DescribeAutoScalingGroups",
                "autoscaling:DescribeLifecycle*"
            ],
            "Resource": "*"
        },
        {
            "Sid": "ASGLifeCycleAccess",
            "Effect": "Allow",
            "Action": [
                "autoscaling:CompleteLifecycleAction",
                "autoscaling:RecordLifecycleActionHeartbeat"
            ],
            "Resource": "arn:aws:autoscaling:*:*:autoScalingGroup:*:autoScalingGroupName/linux-docker-scaling-spotonly*"
        },
        {
            "Sid": "AllowRunnerJobsToDoPredictiveScaling",
            "Effect": "Allow",
            "Action": [
                "autoscaling:UpdateAutoScalingGroup"
            ],
            "Resource": "arn:aws:autoscaling:*:*:autoScalingGroup:*:autoScalingGroupName/linux-docker-scaling-spotonly*"
        },
        {
            "Sid": "EC2SelfAccess",
            "Effect": "Allow",
            "Action": [
                "ec2:DescribeInstances",
                "ec2:DescribeTags"
            ],
            "Resource": "*"
        },
        {
            "Sid": "S3CacheBucketAccess",
            "Effect": "Allow",
            "Action": [
                "s3:GetObject",
                "s3:GetObjectVersion",
                "s3:GetBucketVersioning",
                "s3:PutObject",
                "s3:DeleteObject"
            ],
            "Resource": "arn:aws:s3:::*linux-docker-scaling-spotonly*"
        },
        {
            "Sid": "ECRAccess",
            "Effect": "Allow",
            "Action": "ecr:GetAuthorizationToken",
            "Resource": "*"
        },
        {
            "Sid": "ECRAccessRepo",
            "Effect": "Allow",
            "Action": [
                "ecr:BatchGetImage",
                "ecr:BatchCheckLayerAvailability",
                "ecr:CompleteLayerUpload",
                "ecr:GetDownloadUrlForLayer",
                "ecr:InitiateLayerUpload",
                "ecr:PutImage",
                "ecr:UploadLayerPart"
            ],
            "Resource": "arn:aws:ecr:*:*:*gitlab-spot-demo*"
        }
    ]
}
EOF
- Attach the inline access policy to the role using the put-role-policy command:
aws iam put-role-policy \
    --role-name gitlab-runner \
    --policy-name gitlab-runner-access \
    --policy-document file://~/environment/gitlab-runner-policy.json
- Attach the managed access policy to the role using the attach-role-policy command:
aws iam attach-role-policy \
--policy-arn arn:aws:iam::aws:policy/CloudWatchAgentServerPolicy \
--role-name gitlab-runner

aws iam attach-role-policy \
--policy-arn arn:aws:iam::aws:policy/AmazonSSMManagedInstanceCore \
--role-name gitlab-runner

aws iam attach-role-policy \
--policy-arn arn:aws:iam::aws:policy/service-role/AmazonSSMAutomationRole \
--role-name gitlab-runner

aws iam attach-role-policy \
--policy-arn arn:aws:iam::aws:policy/service-role/AmazonSSMMaintenanceWindowRole \
--role-name gitlab-runner
- Create an instance profile named gitlab-runner-profile using the create-instance-profile command.
aws iam create-instance-profile --instance-profile-name gitlab-runner
- Add the gitlab-runner role to the gitlab-runner instance profile.
aws iam add-role-to-instance-profile \
    --instance-profile-name gitlab-runner \
    --role-name gitlab-runner
Note that here you are assigning permission policies as required for the demo app. In a real Production environment you should always follow the least privilege principle. You can find the best practices in AWS Blogs.
Deploy the CloudFormation stack
You will now get the runner configuration information from GitLab and then start the AWS CloudFormation stack deployment.
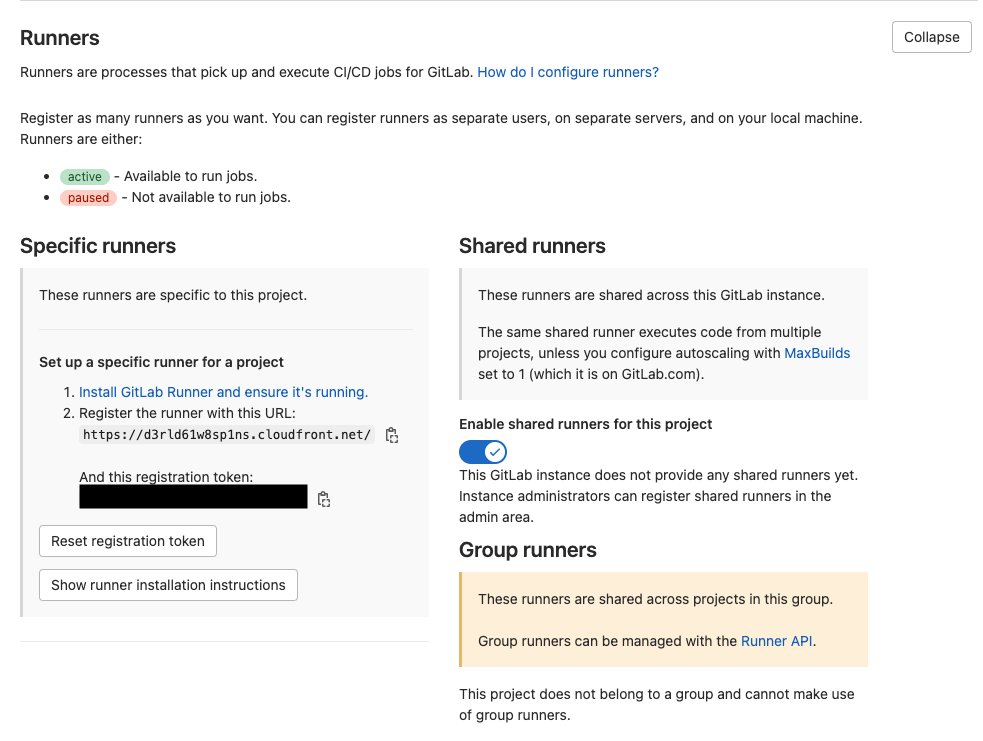
- Return to the browser tab with GitLab.
- In the GitLab Spot Workshop project choose Settings > CI/CD in the navigation pane.
- Expand the Runners section and save into a text file both GitLab URL and the registration token that are displayed on the screen:
-
Download the CloudFormation template latest version located here.
-
Return to the browser tab with CloudFormation or open it again using the search box at the top.
-
Choose Create stack and in the dropdown choose With new resources (standard).
-
In the Template source field select Upload a template file, choose the
GitLabElasticScalingRunner.cf.ymlfile you have just downloaded above, and choose Next. -
In the Stack name field enter
linux-docker-scaling-spotonly(extremely important, as this name is used in the IAM policy above).
Challenge: Investigate the parameters presented and try deploying the stack yourself. Expand the section below to see step-by-step instructions.
- In the GitLab Instance URL field enter GitLab URL you saved previously (in the format
https://xxx.cloudfront.net). - In the One or more runner Registration tokens from the target instance. field enter the token you saved previously.
- In the The S3 bucket that will be used for a shared runner cache. leave the default value (do not enter the GitLabCacheBucket value you saved from CloudFormation Output values, as at the moment the template will still try to create policies using the custom bucket and will fail if a different one is provided).
- In the The number of instances that should be configured. Generally 1 for warm HA and 2 for hot HA. enter
2. - In the Override automatic IAM Instance Profile for a precreated one. type
gitlab-runner. - In the The VPC in the account and region should be used, get the VPC ID (in the format
vpc-...) by running below command in Cloud9:
echo VPC ID = $VPC
- In the field Second priority instance type to be used - if previous priorities are exhausted. Used for Ec2 Fleet when not using spot. enter
m5a.large. For the third and fourth priority enterm5d.largeandm5n.largerespectively. - In the field Whether to AutoScale the Scaling Group. select
truein the dropdown. - In the field Maximum instances in the Scaling Group. type
10. - In the field Scale in threshold (percent). type
40. - In the field How long the scale in threshold should be experienced before triggering scale out. type
60. - In the field Scale out threshold (percent). type
70. - In the field How long the scale out threshold should be experienced before triggering scale out. type
60. - In the field Percentage of non-spot instances when scaling above OnDemandBaseCapacity. type
0. - Leave other parameters with their default values and choose Next, then once again Next.
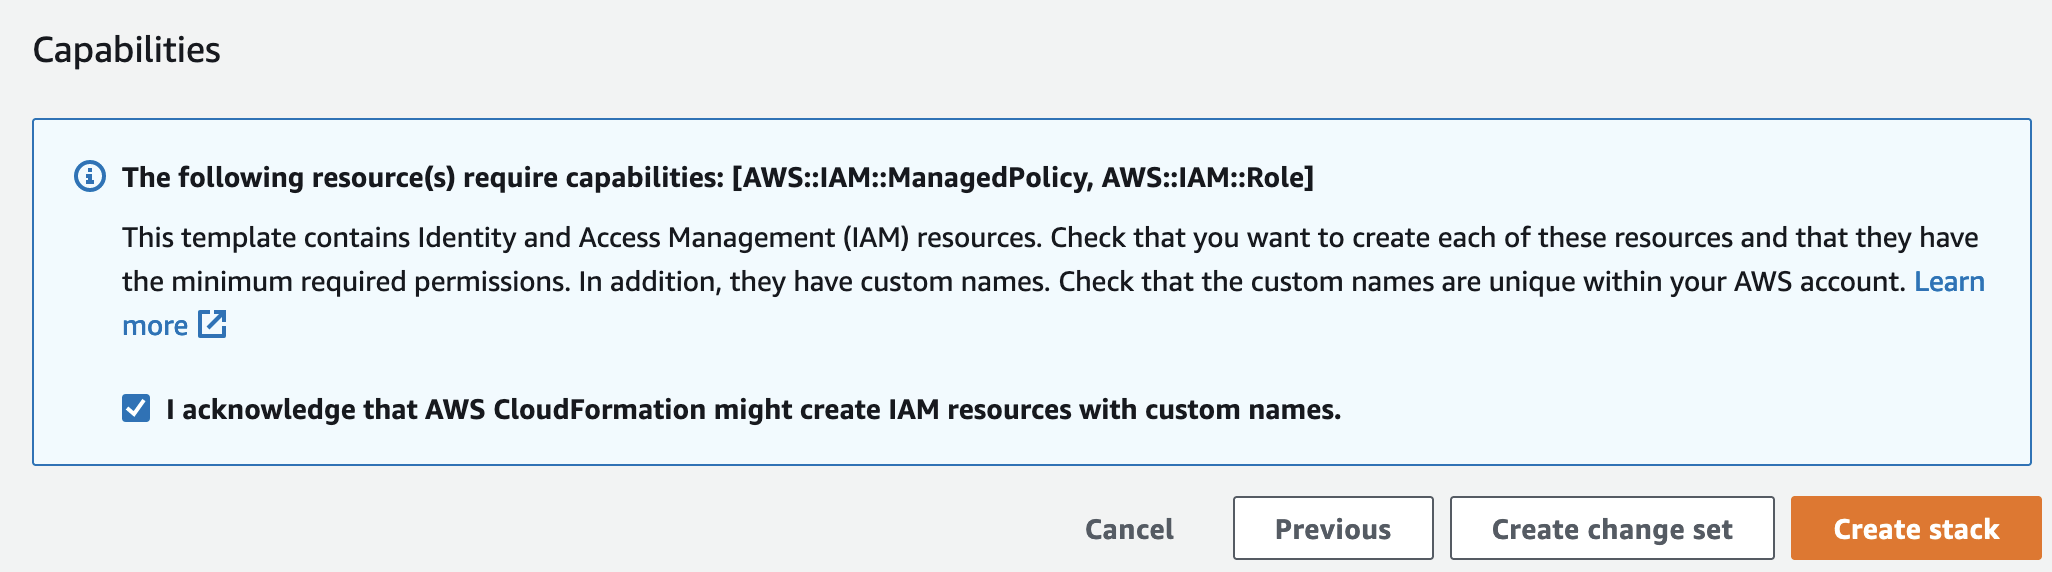
- In the bottom of the screen mark the checkbox I acknowledge that AWS CloudFormation might create IAM resources with custom names., and choose Create stack:
- Wait until the stack is in
CREATE_COMPLETEstatus, which should take approximately 5 minutes.
You had to use the full template to customize the IAM role used by the runners. If your production scenario does not require this and you are fine with the default permissions, you can use one of the easy buttons (out-of-the-box scenarios) provided here to deploy the stack: this will require less parameters to customize.
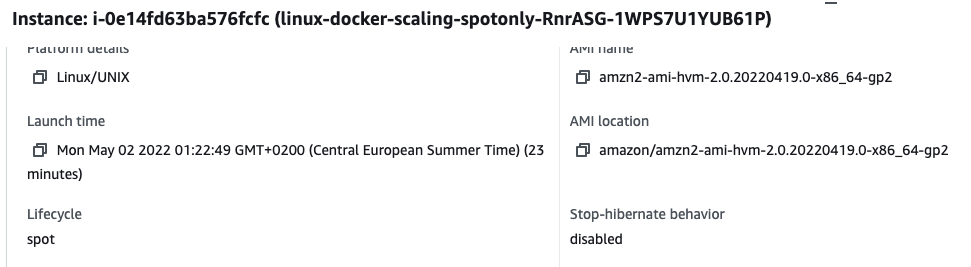
- Now you can open the EC2 console and verify that your runner(s) are using spot instances: open the corresponding EC2 instance (its name starts with
linux-docker-scaling-spotonly-) and check the Lifecycle field:
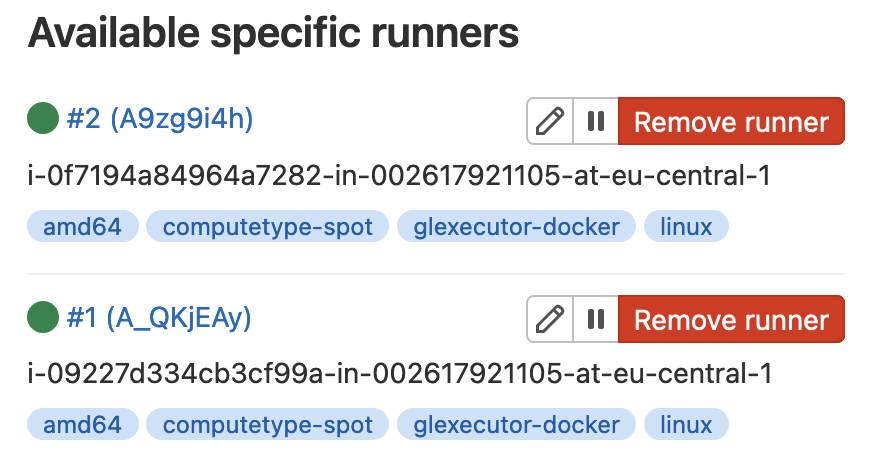
- Return to the browser tab with GitLab, refresh the CI/CD settings page and make sure that your runner(s) have appeared in the Runners section:
You can now proceed to build your application in Building the demo app.