ECS Managed Scaling
Checking the application
So far we have created the service and this has started procuring capacity accordingly and exposing the service through the load balancer that we attached to the workload. Before we proceed with scaling out and down the application, let’s check the application and what it does.
Exercise: How can I get check get access to the web application deployed?
To get access to the application you need to find the URL associated with the service. The URL has been associated to the Load Balancer
that was created as part of the CloudFormation stack. There are a few ways you could get the URL; you could perhaps review AWS console
sections like CloudFormation, or the LoadBalancer section in EC2.
There are a couple of ways you can do. One is using the Cloud9 terminal. In the previous steps we did dump the outpout of the CloudFormation stack to environment variables. Executing this on the Cloud9 initial terminal will show the URL of the Load balancer that is connected with the service.
echo "URL of the service is http://${ALBDNSName}"
The output should be something similar to the line below. Just click on that url and open a new browser window to it.
URL of the service is http://EcsSpotWorkshop-XXXXXXXXXX.<region>.elb.amazonaws.com
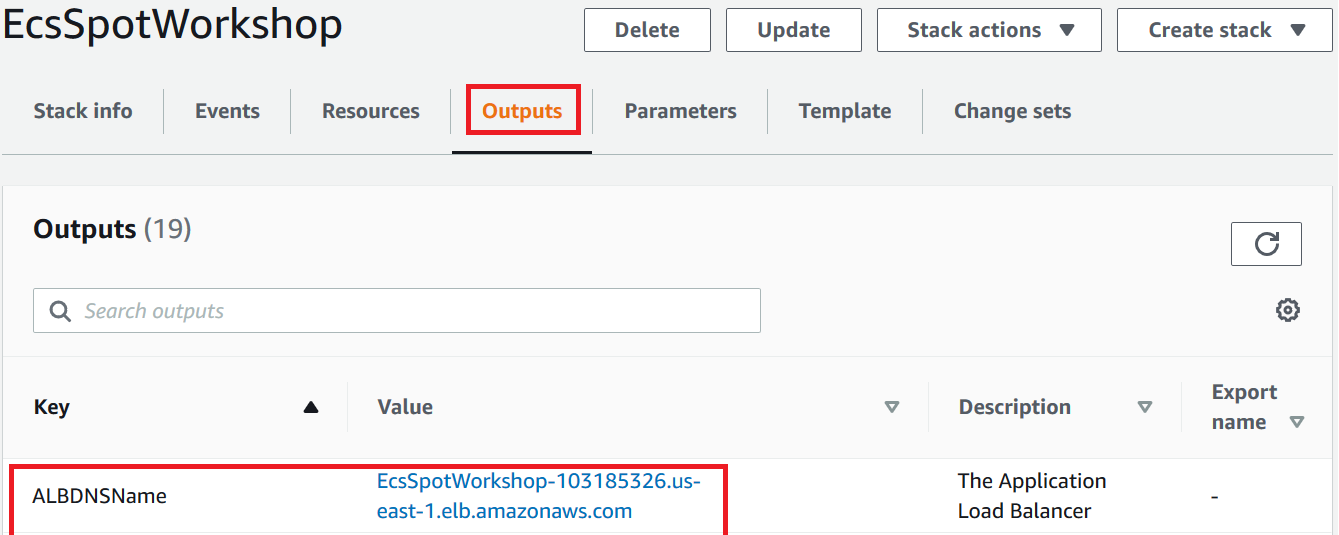
A second way to get to the URL is to get the DNS name of the Application Load Balancer from the output section of the CloudFormation stack.

Open a browser tab and enter this URL. You should see a simple web page displaying various useful info about the task such IP address, availability zone, lifecycle of the EC2 instance.
Once you get the URL, open a browser tab and enter this URL. You should see a simple web page displaying various useful info about the task such IP address, availability zone, lifecycle of the EC2 instance.

ECS Managed Scaling (CAS) in Action
As we explained earlier, ECS offers two different type of scaling:
-
Service Auto Scaling - as the ability to increase or decrease the desired count of tasks in your Amazon ECS service automatically
-
Cluster Auto Scaling (CAS) - as the ability to manage the scaling actions of Auto Scaling group asociated to Capacity Providers.
In this section we will simulate a Service Auto Scaling, by changing manually the number of tasks on the service. We will see how ECS Managed Cluster Auto Scaling calculates the CapacityProviderReservation metric for different Capacity Providers, and procures capacity accordingly. So far we have deployed our initial 10 tasks, you can check the status in the ECS Console by clicking on Cluster EcsSpotWorkshop and then ec2-service-split or alternatively click here to take you to the right console.:

Let’s increase manually the number of tasks on the service and increase them up to 22. Execute the following on Cloud9
aws ecs update-service --cluster EcsSpotWorkshop --service ec2-service-split --desired-count 22 --output table
The change in the numbers of desired tasks should result in a change to the metrics CapacityProviderReservation associated
with the Capacity Providers. If you recall from previous sections, calculation of the CapacityProviderReservation is done with
the following formula CapacityProviderReservation = ( M / N ) * 100.
Exercise: Answers the following questions
-
- What will be the task distribution Spot vs OnDemand?
-
- Can you guess how many new instances will be created?
-
- What is the maximum value we should expect for both the Spot and OnDemand CapacityProviderReservation metric?
-
- Can you find which CloudWatch Alarms are trigger when CapacityProviderReservation increases?
Answer to first question: Let’s find out first how many tasks will be created. As we did before, the weights between OnDemand and Spot on the Capacity Providers are OnDemand=1 and Spot=3. We are creating an extra 12 tasks, which means 3 tasks will be OnDemand and 9 will be Spot. This is on top of our current split of 4 OnDemand tasks and 6 Spot. The final distribution should be 7 On Demand tasks and 15 Spot tasks.
Answer to second question: The way that we have configured the cluster, each instance can provide binpack placement of up to 4 tasks (all instances pool selected offer 2vCPUs and 8GB of RAM). Given that for our capacity providers we selected Target Capacity = 100%, we expect a
total of 2 OnDemand Instances and 4 Spot Instances.
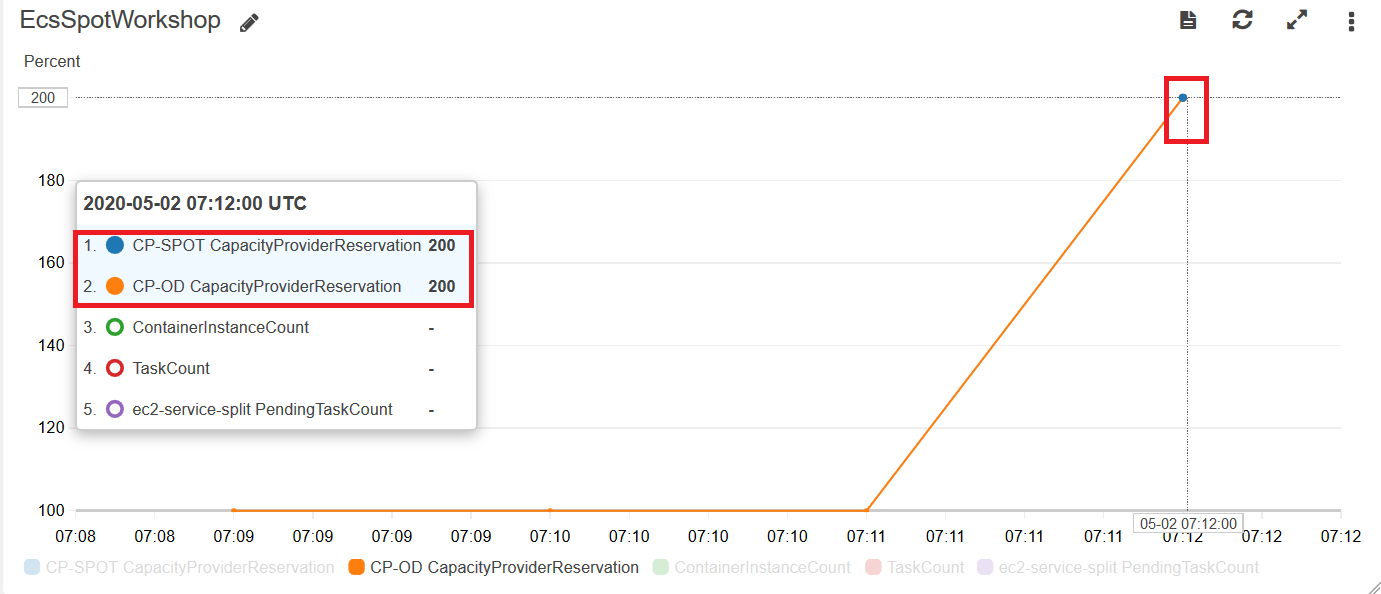
Answer to third question: The calculation of the CapacityProviderReservation for each Capacity Provider is done with the formula CapacityProviderReservation = ( M / N ) * 100. For the Spot Capacity provider, N = 2 is the current number of Spot instances, M = 4
is equal to the number of instances we need to place existing and pending tasks. Using the formula ( M / N ) x 100 we expect the
value to be (4 / 2) * 100 = 200. The calculation for the OnDemand Capacity provider, yield the same result (200).
Answer to the forth question: We should be able to confirm the value of the CapacityProviderReservation in the [AWS Cloudwatch console] (https://console.aws.amazon.com/cloudwatch/home), EcsSpotWorkshop dashboard. At some point you should see in chart how the CapacityProviderReservation metric value is 200 for both CP-OD and SP-SPOT. This triggers the CloudWatch alarms associated with the target tracking policy in the Auto Scaling groups.

If you are in time, you should see how the CloudWatch Alarms are triggered. Go to the CloudWatch console and click on the Alarms section.

Finally to see the activity in the Auto Scaling Group, you can go to EC2 console, select EC2 Spot ASG and click the Activity tab. You should see two instances are just getting launched.

Optional Exercises
Some of this exercises will take time for CAS to scale up and down. If you are running this workshop at a AWS event or with limited time, we recommend to come back to this section once you have completed the workshop, and before getting into the cleanup section.
In this section we propose additional exercises you can do at your own pace to get a better understanding of Capacity Providers, Managed Scaling and Spot instances best practices. We recommend users adopting spot in Test and Production workloads to complete the exercises below to get a better understanding of the different attributes they can change when setting up their cluster configuration. Note we are not providing a solution to this exercises however, you should be able to reach the solutions with with the skills acquired in the previous sections.
-
Scale down the number of desired tasks back to 10. Answer the following questions: a) How long do you expect the trigger to scale down instances to take? b) Can you predict how many instances you will end up with? Tip : read about placement strategies
-
The Service definition we have used so far has used the
BinPackstrategy as the way to define how tasks are placed. a) What would be the effect of changing the placement strategy on the service and repeating the Scale-out & Scale-in exercises we’ve done so far? b) Would the number of instances be the same ? c) In which situations you may want to useSpreadvsBinPackand what are the pros / cons of each placement strategy ? Tip: read about placement strategies -
So far in the Spot Auto Scaling Group, we have used a Mixed Instance Group (MIG) of instances with the same number of vCPU’s and Memory. This has made our calculations and understanding of CAS simple, but it limits the number of pools we diversify Spot instances on. a) Edit the Spot Auto Scaling Group and add instances of different sizes that still respect the vCPU to Memory ratio for example
m5.xlarge,m5a.xlarge,m4.xlarge. b) Can you explain what are the benefits of this configuration? c) Repeat the scaling exercises above and check if this time around you can predict how many instances will be used? d) Can you explain the trade-offs of this configuration? Tip: refresh your spot best Practices knowledge, Read about Spot Capacity optimized allocation Strategy, read how ECS Managed Cluster works with mixed instance sizes