Amazon EC2 Spot Workshops > CI/CD and Test Workloads with EC2 Spot Instances > CI/CD and Test Workloads (GitLab) with EC2 Spot Instances > Create a GitLab repository
Create a GitLab repository
In this lab, you will create a new repository in GitLab and configure it in AWS Cloud9. Next, you will create the source code of the demo app and commit it into the repository.
Log in to GitLab
- Run below command to get GitLab URL and password from saved environment variables:
echo GitLabURL = $GitLabURL
echo GitLabPassword = $GitLabPassword
- Open a new browser tab and proceed to GitLab URL.
- Log in to GitLab with username
rootand the password from GitLabPassword output value.
Create a new repository
Challenge: If you are familiar with GitLab, then test your knowledge by creating a new empty private repository called GitLab Spot Workshop.
Click to reveal the instructions
- Choose New project on the Projects page.
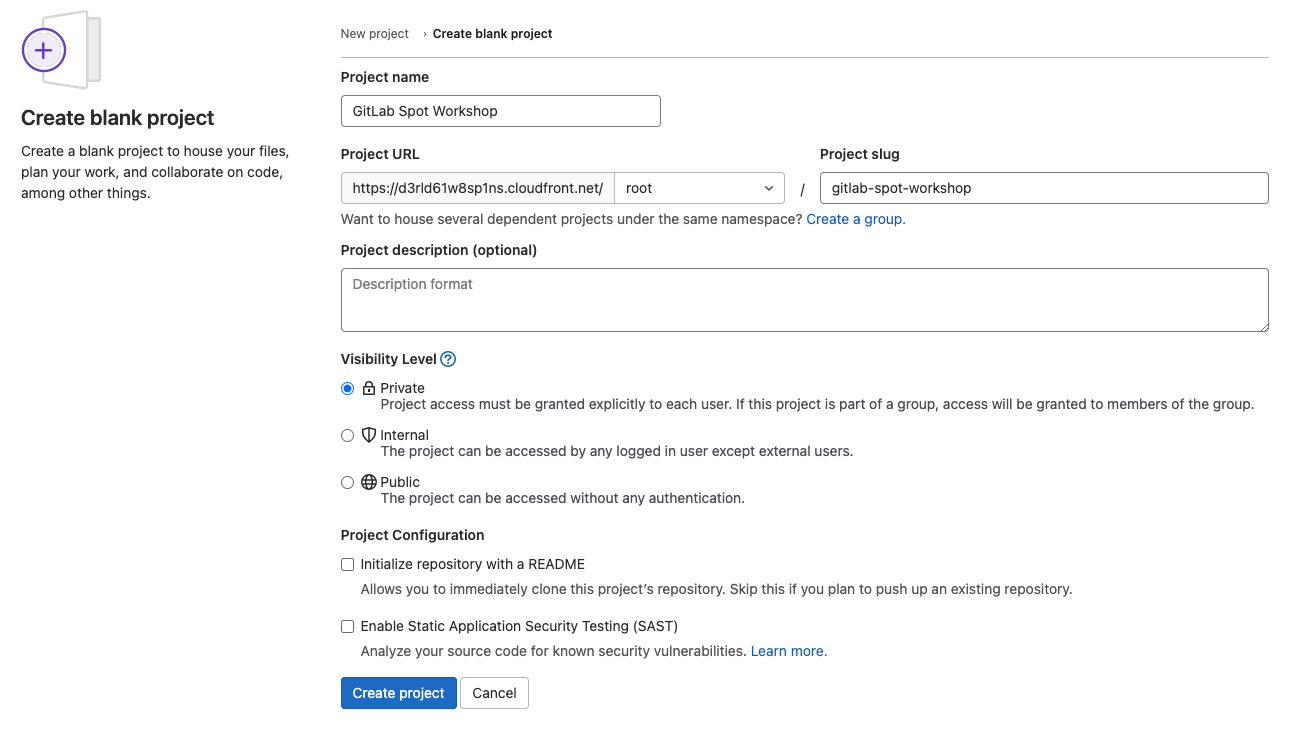
- Choose Create blank project.
- In the Project name field type
GitLab Spot Workshop, in the dropdown next to Project URL selectrootuser, and unmark the checkbox Initialize repository with a README. Leave the rest values as default, and choose Create project:
- Copy the repository URL (in format
https://xxx.cloudfront.net/root/gitlab-spot-workshop.git) that is displayed, for example, in Create a new repository section on the screen.
Add GitLab as origin to the demo app repository
You will now initialize Git repository in the demo app and add your GitLab environment as an origin to it.
- Return to Cloud9 tab and execute the following command to switch to the directory with the demo application:
cd ~/environment/amazon-ec2-spot-cicd-workshop/gitlab-spot/demo-app/
- Execute the following command to substitute the
ECR_ADDRESSand other placeholders with their actual values (like the address of ECR repository created in the CloudFormation stack) and save it into.gitlab-ci.ymlfile as expected by GitLab CI/CD:
TOKEN=$(curl -s -X PUT "http://169.254.169.254/latest/api/token" -H "X-aws-ec2-metadata-token-ttl-seconds: 600")
REGION=$(curl -s -H "X-aws-ec2-metadata-token: $TOKEN" http://169.254.169.254/latest/meta-data/placement/region)
export ECR_INFO=$(aws ecr describe-repositories --region $REGION --query "repositories[?contains(repositoryName, 'gitlab-spot-demo')].repositoryUri" --output text)
export ECR_ADDRESS=$(echo $ECR_INFO | awk -F'/' '{print $1}')
export ECR_NAME=$(echo $ECR_INFO | awk -F'/' '{print $2}')
sed "s/\${ECR_ADDRESS}/${ECR_ADDRESS}/g" template-gitlab-ci.yml | sed "s/\${ECR_NAME}/${ECR_NAME}/g" | sed "s/\${AWS_REGION}/${REGION}/g" > .gitlab-ci.yml
- In the file tree on the left open file
amazon-ec2-spot-cicd-workshop/gitlab-spot/demo-app/.gitlab-ci.yml(if you don’t see it, make sure you have enabled the hidden files in Workshop Preparation). Look through it to understand what it does. - Return to the terminal tab and execute the following commands to define your name and email that will be used in Git (replace
Your Nameandyouremail@test.tldwith the values you prefer):
git config --global user.name "Your Name"
git config --global user.email "youremail@test.tld"
- Optionally you can enable the storage of the GitLab login and password in Git configuration, otherwise you will need to enter them each time you work with the repository:
git config --global credential.helper store
- Initialize Git inside the directory (use the actual URL of GitLab repositoy that you saved in the previous section) and do your first commit:
git init --initial-branch=main
git remote add origin https://xxx.cloudfront.net/root/gitlab-spot-workshop.git
git add .
git commit -m "Initial commit"
You are now ready to do the key step in configuring GitLab CI/CD on Spot instances: add the runners. Please proceed to Configure GitLab runners on Spot instances.