Launch a cluster - Step 1
 Please note: That this workshop has been deprecated. For the latest and updated version featuring the newest features, please access the Workshop at the following link: Cost efficient Spark applications on Amazon EMR.
This workshop remains here for reference to those who have used this workshop before, or those who want to reference this workshop for earlier version.
Please note: That this workshop has been deprecated. For the latest and updated version featuring the newest features, please access the Workshop at the following link: Cost efficient Spark applications on Amazon EMR.
This workshop remains here for reference to those who have used this workshop before, or those who want to reference this workshop for earlier version.
Step 1: Software and Steps
In this step first you will launch EMR cluster that runs on a mix of On-Demand and Spot Instances. Next, you will add step that runs a simple wordcount Spark application against a public dataset of Amazon product reviews located in an Amazon S3 bucket in the N. Virginia region. For this workshop, use the region where the CloudFormation stack was deployed.
Ideally your dataset on S3 would be located in the same region where you run EMR clusters. In this workshop you might run EMR in a different region than N. Virginia, however Spark application will work without any issues with the dataset located in S3 bucket in the N. Virginia region. If you want to know more about the Amazon Customer Reviews Dataset, click here
To launch the cluster, follow these steps:
- Open the EMR console in the region where you are looking to launch your cluster.
- Click “Create cluster”
- Click “Go to advanced options”
- Select the latest EMR 5.x.x release (the console will default to it), and in the list of components, only select Hadoop, Spark and Ganglia. You will use Ganglia to monitor our cluster resource utilization.
- Skip to the “Steps (Optional)” section in the same page, and add a step as per below instructions:
- For the option After last step completes select Clusters enters waiting state. Since you will be examining the cluster during and after the Spark application, you can terminate the cluster at the end of the workshop manually instead of EMR auto-terminating immediately after the completion of step.
Cluster auto-terminates cluster after the last step is completed is a powerful EMR feature that is used for running transient clusters. This is an effective model for clusters that perform periodic processing tasks, such as a daily data processing run, event-driven ETL workloads, etc. You will not be running a transient cluster, since it might terminate before you complete some of the next steps in the workshop.
-
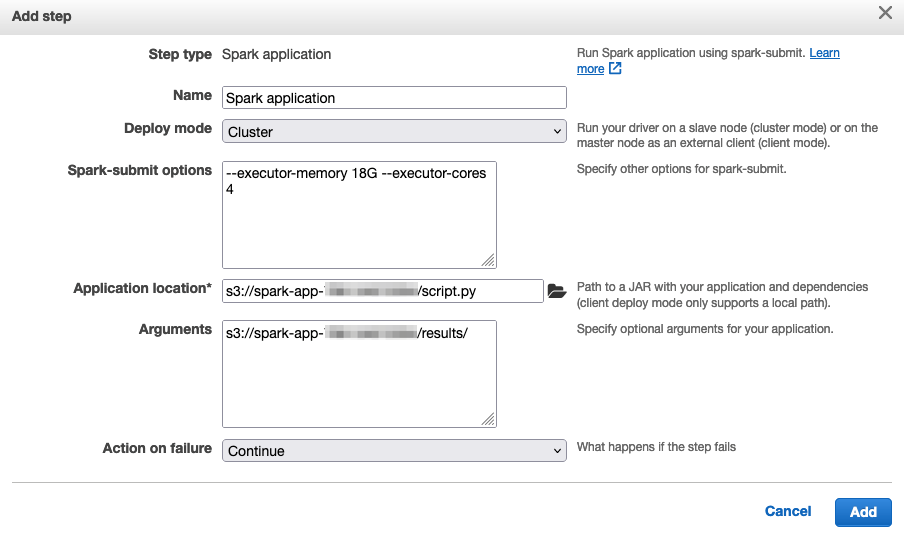
In the Step type drop down menu, select Spark application and click on Add step, then add the following details in the Add step dialog window:
- Spark-submit options: here you configure the memory and core count for each executor, as described in the previous section. Use these settings (make sure you have two ‘-’ chars):
--executor-memory 18G --executor-cores 4-
Application location: here you configure the location of Spark application. We’ve uploaded a Python application to S3 with Cloudformation when starting the workshop. Here’s the code of the application you’ll be using:
import sys from pyspark.sql import SparkSession spark = SparkSession.builder.appName('Amazon reviews word count').getOrCreate() df = spark.read.parquet("s3://amazon-reviews-pds/parquet/") df.selectExpr("explode(split(lower(review_body), ' ')) as words").groupBy("words").count().write.mode("overwrite").parquet(sys.argv[1]) exit() -
Next add the location of the file under the Application location field. Run the following command in the Cloud9 terminal to get the location of
script.pyfile:echo "s3://$S3_BUCKET/script.py" -
Arguments: Here you will configure the location of where Spark will write the results of the job. Run the following command in the Cloud9 terminal to get the location of S3 result bucket:
echo "s3://$S3_BUCKET/results/"Note: If the
S3_BUCKETvariable is empty, you can get bucket name from the CloudFormation stack Outputs atSparkAppBucket- Action on failure: Leave this as Continue. Here’s a screenshot of how the configuration should look like:
-
Click Add to save the step.
Click Next to continue setting up the EMR cluster and move from “Step 1: Software and steps”" to “Step 2: Hardware”.