Create an ECS service
We are very close from testing our scaling rules. Before we create an ECS Service, there are a few things we need to do. First we need to building a container image and store it into ECR and then create an ECS task definition in preparation for our ECS Service.
Building a container image and storing it into ECR
We need an application to scale!. In this section we will build a Docker image using a simple python flask-based web application and deploy in our ECS cluster using ECR (Amazon Elastic Container Registry). CloudFormation deployment has already created an entry in the ECR registry that we will use to store our webapp container image.
Execute the lines below. This might take a couple of minutes. The lines below:
- a) authenticate and retrieve a token to the repository that cloudformation created so we can perform upload operations later on
- b) moves the current working directory over the web application directory where there is a Dockerfile
- c) build a docker image with the application
- d) tag the docker image and upload to the ECR repository
export ECR_REPO_URI=$(aws ecr describe-repositories --repository-names ecs-spot-workshop/webapp | jq -r '.repositories[0].repositoryUri')
aws ecr get-login-password --region $AWS_REGION | docker login --username AWS --password-stdin $ECR_REPO_URI
cd ~/environment/ec2-spot-workshops/workshops/ecs-spot-capacity-providers/webapp/
docker build --no-cache  -t ecs-spot-workshop/webapp .
docker tag ecs-spot-workshop/webapp:latest $ECR_REPO_URI:latest
docker push $ECR_REPO_URI:latest
Creating a task definition for our Service
When creating new services, the service will make a reference to what type of tasks are launched within the service, hence we need to register
a task definition. We have prepared a simple task definition that uses the container image we just created and sets a few parameters such as
the resource required (CPU/Memory) and the ports that will be exposed.
Run the following section. This creates a copy the template ECS Task from templates/ec2-task.json to the current directory and substitutes the template with the actual value of the docker image path. Finally it registers the task so it can be used by Services or deployed to ECS clusters.
cd ~/environment/ec2-spot-workshops/workshops/ecs-spot-capacity-providers/
cp -Rfp templates/ec2-task.json .
sed -i -e "s#DOCKER_IMAGE_URI#$ECR_REPO_URI:latest#g" ec2-task.json
aws ecs register-task-definition --cli-input-json file://ec2-task.json
The task definition will look like this in the console:

Create an ECS Service
To create the service, follow these steps:
- In the ECS Console select the EcsSpotWorkshopUpdate or just click here to open the EcsSpotWorkshopUpdate cluster view
- Select the Services Tab
- Click on Create
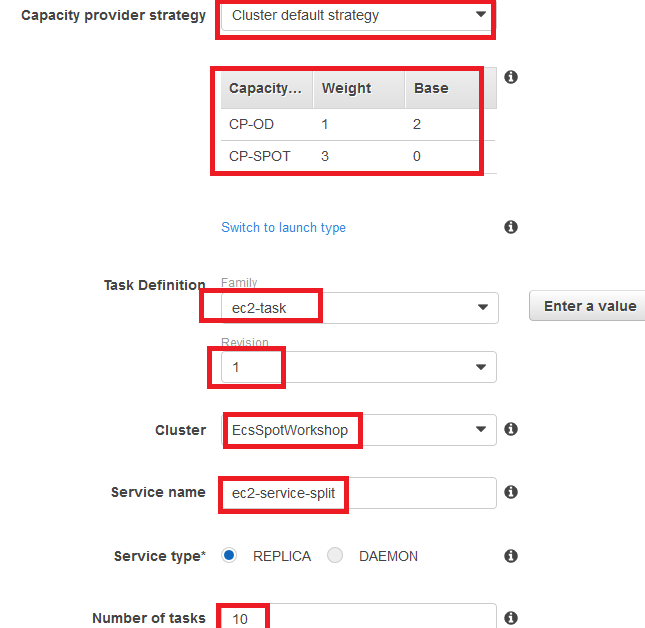
- For Capacity provider strategy, leave it to default value Cluster default Strategy
- For Task Definition Family, select ec2-task
- For Task Definition Revision, select 1
- For Cluster, leave default value EcsSpotWorkshop
- For Service name, ec2-service-split
- For Service type, leave it to the default value REPLICA
- For Number of tasks, enter 10
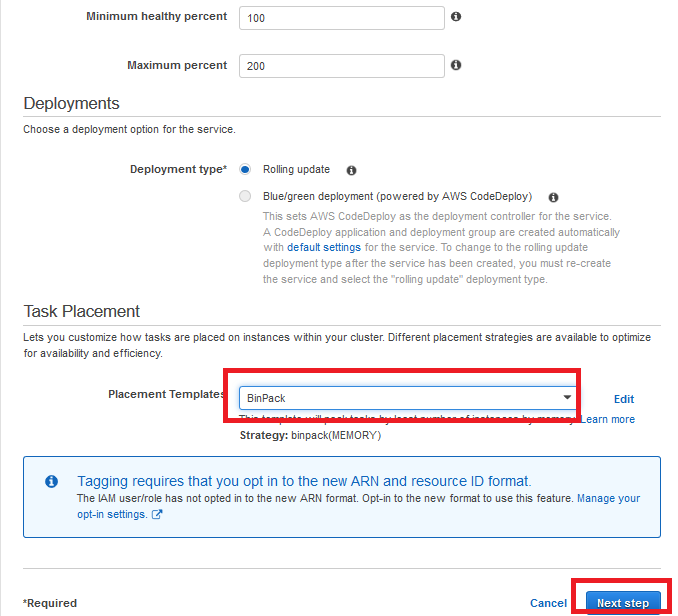
- Leave the default values for Minimum healthy percent and Maximum percent
- Under Deployments section, leave it to default values
- Under Task Placement section, for Placement Templates, select BinPack
- Under Task tagging configuration section, leave it to default values
- Click on Next Step
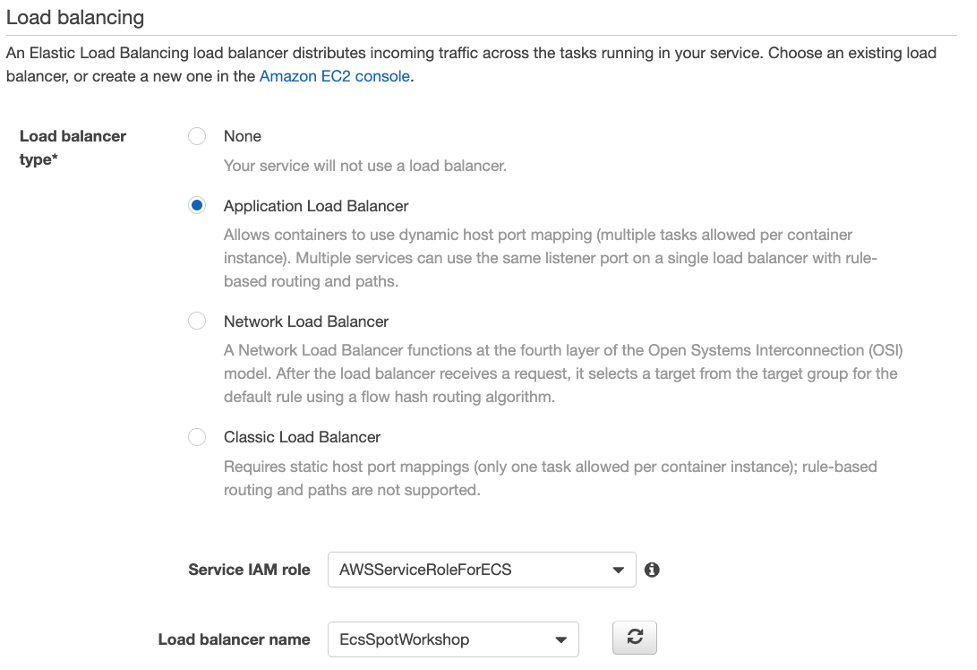
- Under Configure network section, in Load balancing, for Load balancer type*, select Application Load Balancer
- For Service IAM role, leave default value
- For Load balancer name, select EcsSpotWorkshop
- Under Container to load balance, for Container name : port, click on add to load balancer
- For Production listener port, Select HTTP:80 from the dropdown list
- For Production listener protocol, leave default value of HTTP
- For Target group name, select EcsSpotWorkshop from the list
- Leave default values for Target group protocol, Target type, Path pattern, Health check path
- Click on Next Step

- Under Set Auto Scaling (optional), leave default value for service auto scaling
- Click on Next Step
- Click on Create Service
- Click on View Service
It may take up to a couple of mintues for the capacity to be provisioned and the task to be running. You can check the CloudWatch Dashboard or the C3VIS tool that we used in the previous sections to check out for changes in the cluster once the service is created.
Exercise :
Question: Given the Capacity Provider Strategy in use (OnDemand Capacity Provider Base=2, weight=1, Spot Capacity Provider Base=0, weight=3), Could you predict how many out of the 10 tasks will be running in Spot instances versus how many will be running on OnDemand Instances?
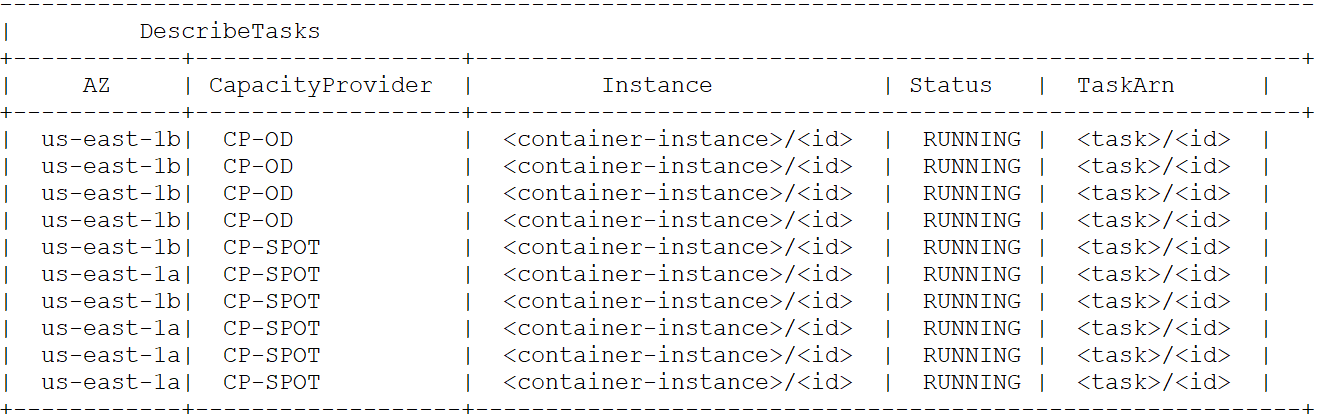
The CLI can help you to provide details of how tasks are spread across capacity providers. You can use aws ecs describe-tasks to validate your response.
Given the split OnDemand Capacity Provider Base=2, weight=1, Spot Capacity Provider Base=0, weight=3, we should expect
- The first 2 tasks to be deployed on demand, leaving us with extra 8 tasks to distribute according to weights.
- The 8 tasks get’s distribute on a 1:3 ratio, meaning that 2 tasks more go to OnDemand and 6 to Spot
The tasks should distributed as OnDemand = 4 tasks and Spot =6 tasks. We can veryfy it by running the following command in the Cloud9 terminal
export cluster_name=EcsSpotWorkshop
export service_name=ec2-service-split
aws ecs describe-tasks \
--tasks $(aws ecs list-tasks --cluster $cluster_name \
--service-name $service_name --query taskArns[*] --output text) \
--cluster $cluster_name \
--query 'sort_by(tasks,&capacityProviderName)[*].{TaskArn:taskArn,CapacityProvider:capacityProviderName,Instance:containerInstanceArn,AZ:availabilityZone,Status:lastStatus}' \
--output table
Your results should be similar to the ones below: