Workflow orchestration
You have now all the AWS Batch components in place, and are ready to start submitting jobs that will be placed in a queue and processed by a compute environment when AWS Batch’s scheduler starts running them. We are going to use AWS Step Functions to orchestrate the execution of our rendering pipeline, from the pre-processing of the Blender file to the stitching of the frames.
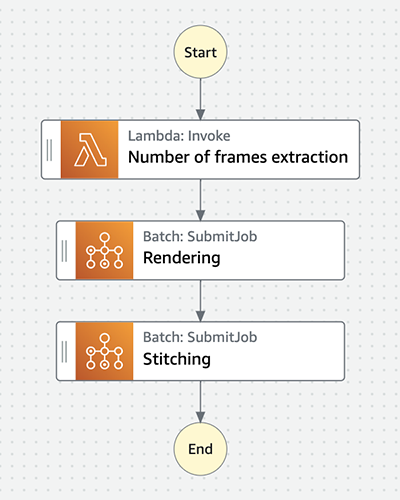
AWS Step Functions helps you orchestrate your AWS Batch jobs using serverless workflows, called state machines. You can use Step Functions to orchestrate preprocessing of data and Batch to handle the large compute executions, providing an automated, scalable, and managed batch computing workflow. The CloudFormation template has created the following state machine:
You can notice that each step in the rendering pipeline has been mapped to a state. In AWS Step Functions, you can create state machines using the Amazon States Language or the AWS Step Functions Workflow Studio.
The script needs: (a) the location of the blender file, (b) the location where results will be uploaded, (c) the Job Definition that will be used to submit the job, (d) the Job Queue where it will be placed and (e) the name that will be used to submit it.
The state machine will:
- Download the Blender file from S3 to determine how many frames it has.
- Submit a Batch array job that will run Blender to render the frames in parallel.
- Submit a Batch job that will run FFmpeg to produce the final video.
To start the process, perform the following api call to pass a payload to the state machine with the job name, input path, output path, ARNs of the Job Definition and Job queue for AWS Batch to use and the number of frames each job has to render:
export JOB_NAME="Pottery"
export EXECUTION_ARN=$(aws stepfunctions start-execution --state-machine-arn "${StateMachineArn}" --input "{\"jobName\": \"${JOB_NAME}\", \"inputUri\": \"s3://${BucketName}/${BlendFileName}\", \"outputUri\": \"s3://${BucketName}/${JOB_NAME}\", \"jobDefinitionArn\": \"${JOB_DEFINITION_ARN}\", \"jobQueueArn\": \"${JOB_QUEUE_ARN}\", \"framesPerJob\": \"1\"}" | jq -r '.executionArn')
echo "State machine started. Execution Arn: ${EXECUTION_ARN}."
To learn more about this API, see start-execution CLI Command Reference. At this point the state machine is started and you are ready to monitor the progress of the pipeline.
Optional: understanding the state machine
We have orchestrated the workflow of the rendering pipeline using an AWS Step Functions state machine. Feel free to move to the next section and monitor its execution, but if at some point you are interested in knowing the details of its states, you can read the sections below.
State Number of frames extraction
This is the entry point of our state machine. In this state, a Lambda function is invoked to determine the number of frames of the Blender file. To do that, we are using a script included in Blender’s script library that extracts information related to the scenes of the composition. In broad strokes, the Lambda function implements the following logic:
- Receives the payload that we passed on to the state machine when we started it.
- Downloads the Blender file from S3.
- Reads the number of frames of the file.
- Calculates the dimension of the Batch array job taking into account the number of frames and how many frames each job has to render.
An array job is a job that shares common parameters, such as the job definition, vCPUs, and memory. It runs as a collection of related, yet separate, basic jobs that may be distributed across multiple hosts and may run concurrently. At runtime, the AWS_BATCH_JOB_ARRAY_INDEX environment variable is set to the container’s corresponding job array index number. This is how the bash script is able to calculate the slice of frames that needs to render.
To learn more about it, visit Array jobs and Tutorial: Using the Array Job Index to Control Job Differentiation.
You can view the Lambda function in the following URL:
echo "https://console.aws.amazon.com/lambda/home?region=${AWS_DEFAULT_REGION}#/functions/${PreprocessingLambda}?tab=code"
State Rendering
Submits an AWS Batch array job of dimension n, where n is the number returned by the Lambda function of the previous state. Three important configurations are implemented in the definition of this state:
-
Extraction of the ARNs of the Job Definition and Job Queue from the payload received by the state machine using a JSONPath expression. Those are passed on to AWS Batch when submitting the job:
 1"Rendering": {
 2  "Type": "Task",
 3  "Resource": "arn:aws:states:::batch:submitJob.sync",
 4  "Parameters": {
 5    "JobName": "Rendering",
 6    "ArrayProperties": {
 7      "Size.$": "$.output.Payload.body.arrayJobSize"
 8    },
 9    "Parameters": {
10      "action": "render",
11      "inputUri.$": "$.inputUri",
12      "outputUri.$": "$.outputUri",
13      "framesPerJob.$": "$.framesPerJob"
14    },
15    "JobDefinition.$": "$.jobDefinitionArn",
16    "JobQueue.$": "$.jobQueueArn"
17  },
18  "Next": "Stitching",
19  "ResultPath": "$.output"
20}
Read this blog post to learn how to effectively use JSONPath expressions in AWS Step Functions.
-
Setting the dimension of the array job by specifying a value for the attribute
Sizeinside theArrayPropertiesstructure. Now, we are taking that value from the output of the previous state:1"Rendering": { 2 "Type": "Task", 3 "Resource": "arn:aws:states:::batch:submitJob.sync", 4 "Parameters": { 5 "JobName": "Rendering", 6 "ArrayProperties": { 7 "Size.$": "$.output.Payload.body.arrayJobSize" 8 }, 9 "Parameters": { 10 "action": "render", 11 "inputUri.$": "$.inputUri", 12 "outputUri.$": "$.outputUri", 13 "framesPerJob.$": "$.framesPerJob" 14 }, 15 "JobDefinition.$": "$.jobDefinitionArn", 16 "JobQueue.$": "$.jobQueueArn" 17 }, 18 "Next": "Stitching", 19 "ResultPath": "$.output" 20} -
Setting a value for the parameters defined in the Job Definition. If you remember, we did specify a
commandattribute with the value["Ref::action", "-i", "Ref::inputUri", "-o", "Ref::outputUri", "-f", "Ref::framesPerJob"]when we created the Job Definition. Now it’s time to give a value to the placeholders in that expression:1"Rendering": { 2 "Type": "Task", 3 "Resource": "arn:aws:states:::batch:submitJob.sync", 4 "Parameters": { 5 "JobName": "Rendering", 6 "ArrayProperties": { 7 "Size.$": "$.output.Payload.body.arrayJobSize" 8 }, 9 "Parameters": { 10 "action": "render", 11 "inputUri.$": "$.inputUri", 12 "outputUri.$": "$.outputUri", 13 "framesPerJob.$": "$.framesPerJob" 14 }, 15 "JobDefinition.$": "$.jobDefinitionArn", 16 "JobQueue.$": "$.jobQueueArn" 17 }, 18 "Next": "Stitching", 19 "ResultPath": "$.output" 20}
As you can see, the action is set to render, since this state implements the rendering part of the pipeline.
State Stitching
Similarly to the previous state, the Stitching state launches an AWS Batch job but, in this case, it is a single job. By the way we have defined the execution flow of the state machine, this state will be executed after the previous state has completed its execution. Optionally, in AWS Batch you can define job dependencies to manage the relationship of jobs and start them when others finish their execution. To learn more about job dependencies visit Job Dependencies and to learn more about AWS Step Functions transitions visit Transitions.
The only configuration of this state that differs from the previous is the value of the parameter action, that in this case is set to stitch so that our Docker container runs FFmpeg to produce the video when all the frames have been rendered.