Creating the compute environment
We are going to create two compute environments: one using Spot instances and another one using On-Demand instances. That way, if your job needs to comply with SLAs, the On-Demand proportion can be used to ensure a timely completion while the Spot will be used to accelerate the run and reduce the overall cost.
Spot Compute environment creation
Run the following to generate the configuration file that will be used to create the AWS Batch compute environment that uses Spot instances:
export SPOT_COMPUTE_ENV_NAME="RenderingSpotComputeEnvironment"
cat <<EoF > spot-compute-environment-config.json
{
"computeEnvironmentName": "${SPOT_COMPUTE_ENV_NAME}",
"type": "MANAGED",
"state": "ENABLED",
"computeResources": {
"type": "SPOT",
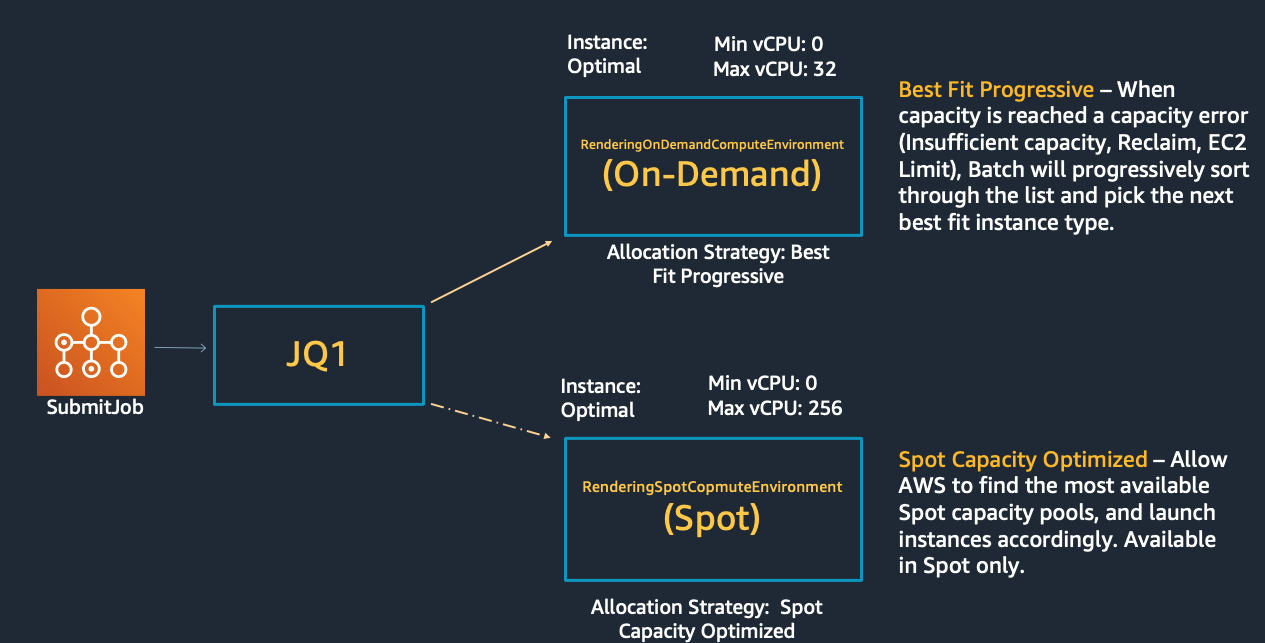
"allocationStrategy": "SPOT_CAPACITY_OPTIMIZED",
"minvCpus": 0,
"maxvCpus": 256,
"desiredvCpus": 0,
"instanceTypes": [
"optimal"
],
"subnets": ["${Subnet1}", "${Subnet2}"],
"launchTemplate": {
"launchTemplateName": "${LaunchTemplateName}"
},
"instanceRole": "${ECSInstanceProfile}",
"tags":{"type":"Spot"}
}
}
EoF
Let’s explore the configuration parameters in the computeResources structure:
- type: specifies the compute resource type to use. This compute environment will use Spot instances, hence the
SPOTvalue. The other possible values areEC2,FARGATEandFARGATE_SPOT. - allocationStrategy: the allocation strategy to use for the compute resource if not enough instances of the best fitting instance type can be allocated. The
SPOT_CAPACITY_OPTIMIZEDallocation strategy allocates instances from the Spot Instance pools with the optimal capacity for the number of instances that are launching, making use of real-time capacity data and optimizing the selection of used Spot Instances. You can read about the benefits of usingcapcity-optimizedin the blog post Capacity-Optimized Spot Instance allocation in action at Mobileye and Skyscanner. This way, AWS Batch will select one or more instance types that are large enough to meet the requirements of the jobs in the queue, with a preference for instance types that are less likely to be interrupted. To learn more about allocation strategies, see Allocation strategies. - instanceTypes: the instances types that can be launched. By specifying
optimal, instance types from the C4, M4, and R4 instance families are selected to match the demand of your job queues. - subnets: the VPC subnets where the compute resources are launched.
- launchTemplate: the launch template to use when launching compute resources. We specify the one we created earlier so that the User data script is applied to every instance that is launched.
- instanceRole: the Amazon ECS instance profile applied to Amazon EC2 instances in the compute environment. AWS Batch compute environments are populated with Amazon ECS container instances, and they run the Amazon ECS container agent locally. The Amazon ECS container agent makes calls to various AWS API operations on your behalf. Therefore, container instances that run the agent require an IAM policy and role for these services to recognize that the agent belongs to you. For more information read Amazon ECS instance role.
- tags: the tags that will be applied to EC2 instances launched within this compute environment. Later in this lab, we will use the
type : Spottag to filter EC2 instances for AWS Fault Injection Simulator (AWS FIS) experiments.
Run this command to create the AWS Batch compute environment and export its ARN to an environment variable. To learn more about this API, see create-compute-environment CLI command reference.
export SPOT_COMPUTE_ENV_ARN=$(aws batch create-compute-environment --cli-input-json file://spot-compute-environment-config.json | jq -r '.computeEnvironmentArn')
echo "Spot compute environment Arn: ${SPOT_COMPUTE_ENV_ARN}"
On-Demand Compute environment creation
Run the following to generate the configuration file that will be used to create the AWS Batch compute environment that uses On-Demand instances:
export ONDEMAND_COMPUTE_ENV_NAME="RenderingOnDemandComputeEnvironment"

cat <<EoF > ondemand-compute-environment-config.json
{
    "computeEnvironmentName": "${ONDEMAND_COMPUTE_ENV_NAME}",
    "type": "MANAGED",
    "state": "ENABLED",
    "computeResources": {
        "type": "EC2",
        "allocationStrategy": "BEST_FIT_PROGRESSIVE",
        "minvCpus": 0,
        "maxvCpus": 32,
        "desiredvCpus": 4,
        "instanceTypes": [
            "optimal"
        ],
        "subnets": ["${Subnet1}", "${Subnet2}"],
        "launchTemplate": {
            "launchTemplateName": "${LaunchTemplateName}"
        },
        "instanceRole": "${ECSInstanceProfile}",
        "tags":{"type":"OnDemand"}
    }
}
EoF
Let’s explore the configuration parameters in the computeResources structure that differ from the previous Compute environment:
- type: specifies the compute resource type to use. This compute environment will use On-demand instances, hence the
EC2value. The other possible values areSPOT,FARGATEandFARGATE_SPOT. - allocationStrategy: the allocation strategy to use for the compute resource if not enough instances of the best fitting instance type can be allocated. By specifying
BEST_FIT_PROGRESSIVE, AWS Batch selects an instance type that best fits the needs of the jobs with a preference for the lowest-cost instance type.
Notice how we have specified lower values for maxvCpus and desiredvCpus in comparison to the same of the Spot compute environment. We do so to make sure that only the required compute capacity to finish the job in a finite amount of time is provisioned with On-demand capacity, using more Spot resources to reduce execution time and cost.
Execute this command to create the AWS Batch compute environment and export its ARN to an environment variable.
export ONDEMAND_COMPUTE_ENV_ARN=$(aws batch create-compute-environment --cli-input-json file://ondemand-compute-environment-config.json | jq -r '.computeEnvironmentArn')
echo "On-Demand compute environment Arn: ${ONDEMAND_COMPUTE_ENV_ARN}"
Next, you are going to create a job queue that is going to be associated to these compute environments.