Deploying Amazon EKS on Spot instances
You will now deploy an Amazon EKS cluster in order to roll out your newly built application into it. In this lab you will use Terraform by HashiCorp for this purpose. However, you can also do it using AWS CloudFormation, AWS CDK or eksctl.
The Terraform files are located in ~/environment/amazon-ec2-spot-cicd-workshop/gitlab-spot/eks-cluster directory of your Cloud9 environment.
- Return to the browser tab with Cloud9 and execute the following commands in the terminal to download and install
kubectlthat you will be using to work with the Kubernetes cluster:
cd ~/environment
export KUBECTL_VERSION=v1.23.7
sudo curl --silent --location -o /usr/local/bin/kubectl https://storage.googleapis.com/kubernetes-release/release/${KUBECTL_VERSION}/bin/linux/amd64/kubectl
sudo chmod +x /usr/local/bin/kubectl
- Switch to the directory with IaC templates, initialize the Terraform working directory, and apply the changes:
cd ~/environment/amazon-ec2-spot-cicd-workshop/gitlab-spot/eks-cluster
terraform init
TOKEN=$(curl -s -X PUT "http://169.254.169.254/latest/api/token" -H "X-aws-ec2-metadata-token-ttl-seconds: 600")
export TF_VAR_aws_region=$(curl -s -H "X-aws-ec2-metadata-token: $TOKEN" http://169.254.169.254/latest/meta-data/placement/region)
curl -o iam-policy.json https://raw.githubusercontent.com/kubernetes-sigs/aws-load-balancer-controller/main/docs/install/iam_policy.json
export TF_VAR_alb_policy=$(aws iam get-policy --policy-arn arn:aws:iam::$(aws sts get-caller-identity --output text --query Account):policy/AWSLoadBalancerControllerIAMPolicy --query Policy.Arn --output text 2>/dev/null || aws iam create-policy --policy-name AWSLoadBalancerControllerIAMPolicy --policy-document file://iam-policy.json --query Policy.Arn --output text)
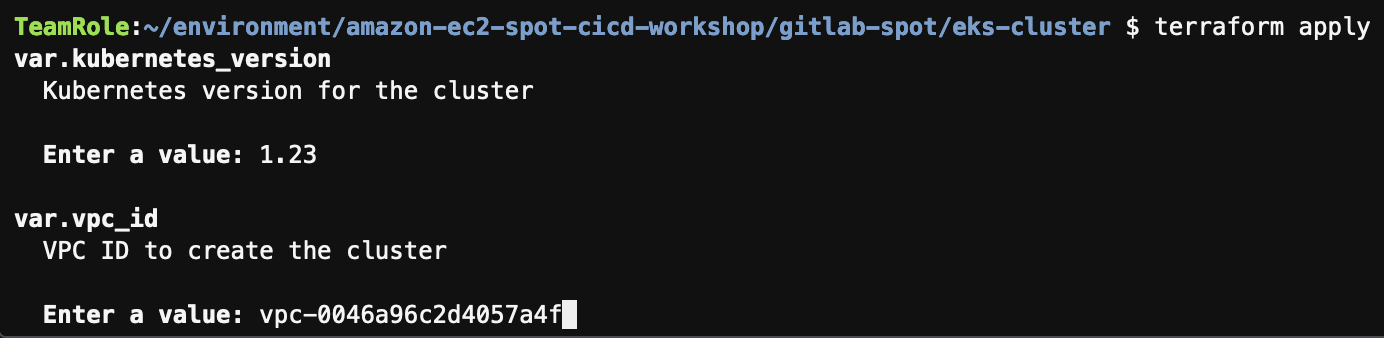
terraform apply
- When asked for the parameters, enter the following values:
- kubernetes_version: enter
1.23 - vpc_id: open a new terminal in Cloud9 and run below command to get the VPC ID
echo VPC ID = $VPC - kubernetes_version: enter
- When asked if you want to perform the changes, check the list of resources to be created, type
yes, and press Enter. It should take approximately 15 minutes to deploy the cluster. - After the process has finished, execute the following command to update the
kubeconfig, using the information from Amazon EKS:
aws eks update-kubeconfig --region $TF_VAR_aws_region --name gitlab-spot-workshop
- Execute the below commands to verify that you can reach Kubernetes API. The first should return all Kubernetes resources across the namespaces and the second should show 3 worker nodes:
kubectl get all -A
kubectl get nodes
- Execute the below command to install AWS Load Balancer Controller (it will be used to configure Application Load Balancer for your pods):
curl -sSL https://raw.githubusercontent.com/helm/helm/master/scripts/get-helm-3 | bash
helm repo add eks https://aws.github.io/eks-charts
helm install aws-load-balancer-controller eks/aws-load-balancer-controller --set clusterName=gitlab-spot-workshop -n kube-system
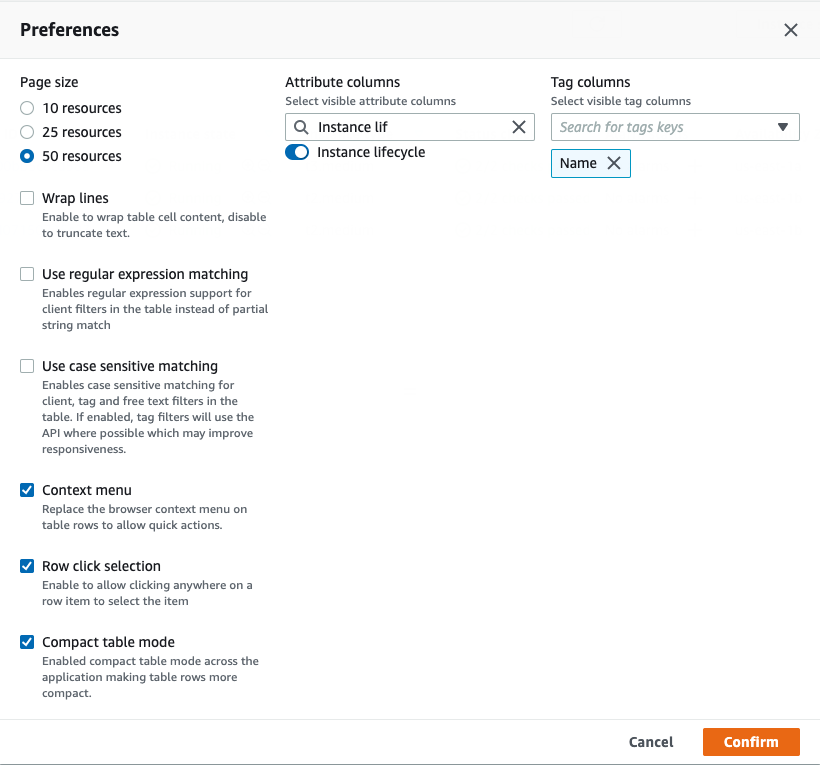
- Return to the browser tab with EC2 console or open it again and make sure that the worker nodes are using spot instances: you can either select each instance called
spot_groupone-by-one and check the value of the Lifecycle field in the description tab below or enable its display in the main table by choosing the cogwheel icon in the top-right corner, searching forInstance lifecyclein the Attribute columns field, enabling the toggle next to it, and choosing Confirm:

Add GitLab role to Kubernetes RBAC
By default, the IAM user or role that created Amazon EKS cluster gets access to its Kubernetes API. However, as you have different roles assigned to the Cloud9 environment and the GitLab runners, you need to add the latter to Kubernetes Role Based Access Control (RBAC).
You will do it by manually modifying Kubernetes ConfigMap called aws-auth. You could have done it directly in Terraform, but in this workshop we suggest that you do it manually to better understand the concepts.
- Return to the browser tab with Cloud9 and in the terminal execute the following command, which will save the ConfigMap current manifest into
aws-auth.yamlfile:
cd ~/environment
kubectl get configmap -n kube-system aws-auth -o yaml > aws-auth.yaml
- To generate the lines that you will add into the file, execute the following commands:
export ACCOUNT_ID=$(aws sts get-caller-identity --output text --query Account)
cat << EoF
    - rolearn: arn:aws:iam::${ACCOUNT_ID}:role/gitlab-runner
      groups:
      - system:masters
      username: gitlab-runner
EoF
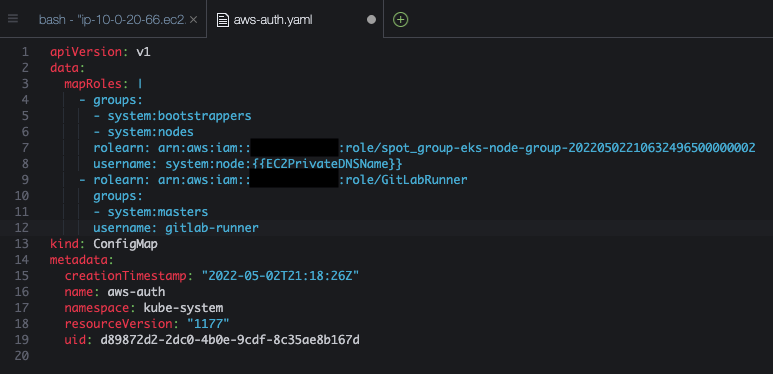
- Copy the output of the last command, then in the file tree on the left open the file
aws-auth.yamlby double-clicking it, and finally add the previous command’s output that you copied before intomapRolessection. You should have something similar to the below screenshot:
- Save the file, using Ctrl + S or Cmd + S depending on your Operating System, or choosing File > Save. Then close it.
- Apply the Kubernetes manifest using the command below (you can ignore the warning about missing annotation):
kubectl apply -f aws-auth.yaml
You are now ready for the final steps to deploy your demo application into the cluster in Installing the demo app into Amazon EKS.
Challenge
Instead of using Terraform try deploying the Amazon EKS cluster with eksctl.
You can find step-by-step instructions in the Containers with EKS workshop, but make sure you modify them to use the VPC you created in this workshop.